External render protects the substrate beneath from wind-driven rain, but once it starts failing the damage can accelerate quickly. Water gets behind cracked or blown render, accelerates freeze-thaw spalling, and can drive damp into the wall before any visible signs appear inside. Catching problems early, and choosing the right repair approach, is considerably cheaper than waiting until large sections need hacking off.
The correct repair method depends entirely on the type of render already on the wall. Applying a hard cement patch to a lime render building, or a lime patch to a polymer system, will create differential movement and fail within a few years.
Types of External Render
Understanding what is already on the wall is the essential first step before any repair.
Sand and cement render has been the UK standard from the mid-twentieth century onwards, usually gauged with lime or a plasticiser rather than mixed from cement and sand alone. Approved Document C’s example for a rendered solid wall in severe exposure uses one part cement, one part lime and six parts sand.1 That render is applied in two coats with a total thickness of at least 20mm.1 It is rigid and relatively impermeable, which suits modern cavity-wall construction but can be problematic on older solid-wall properties where it traps moisture.
Lime render today usually uses natural hydraulic lime (NHL) as the binder, graded NHL 2, 3.5 or 5; the more hydraulic the lime, the stronger it is but the less permeable and flexible.2 NHL 2 is the softest and most breathable, suited to very old or soft brick and stone; NHL 3.5 is a general-purpose choice for most pre-1919 solid-wall properties; NHL 5 approaches the hardness of weak cement and is used in exposed coastal or upland locations. Lime render allows walls to breathe, accommodates minor movement, and is usually the appropriate choice for solid-walled buildings constructed before cavity walls became standard (broadly pre-1920).3
Monocouche (through-colour) render is a factory-blended single-coat product applied at about 15–20mm thickness.4 It is pigmented throughout, so the colour is integral rather than painted on. Lifespan is typically 20–30 years. K-Rend, Parex, and Weber are common UK brand families, though generic polymer monocouche products are also widely available.
Silicone and acrylic renders are thin-coat systems (1.5–3mm) applied over a reinforcing mesh and basecoat.5 Silicone renders are water-repellent, flexible and vapour-permeable.4 They are now widely used for new external wall insulation (EWI) systems and for refurbishing existing rendered facades. Acrylic renders are similar but slightly less breathable.
Common Render Failures
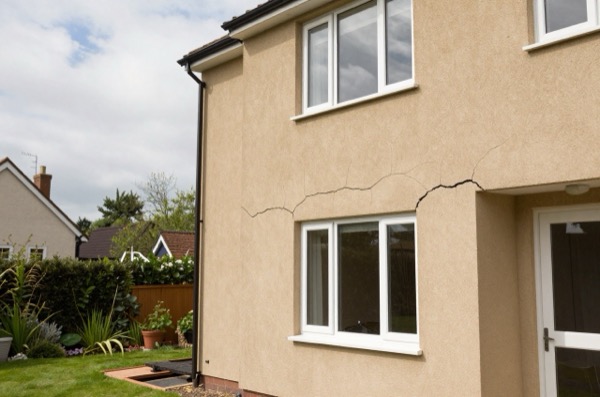
Crazing, a fine network of surface cracks, often forming a map or spider-web pattern, is caused by the render skin drying and shrinking too fast during application (low suction substrate, hot dry weather, or a mix that was too wet). Crazing cracks are typically less than 0.3mm wide. They rarely cause structural problems but can allow water ingress if deep.
Structural cracking, cracks wider than 1mm, diagonal cracks following mortar joints, or cracks that widen and narrow with the seasons, indicate differential movement between the render and the substrate, or in the substrate itself. These require investigation before repair; simply filling them will not hold.
Hollow or drummy render describes areas where the render has debonded from the wall behind. Tapping with a wooden mallet or the knuckle produces a hollow drumming sound rather than a solid thud. Drummy render may be visually intact but has lost adhesion and will eventually fall off in sheets.
Blown render is render that has fully delaminated, often in a visible bulge or with sections already fallen away. Frost is a common final cause, but the underlying failure is usually debonding triggered by moisture behind the render.
Staining, rust-coloured streaks, green algae growth, or tide-mark water staining, indicates either inadequate weathering details (missing or damaged bell beads, window reveals, abutments) or a render that has become porous over time.
How to Diagnose Render Problems
A systematic tap test covers the whole facade in sections, marking hollow areas with chalk. Hollow areas larger than roughly 0.5m² are generally not worth patching; the surrounding adhesion is usually marginal and the patch edges will crack as the remaining loose render continues to move.
Crack width is assessed with a crack gauge (a card template with graduated slots). As a rule of thumb, cracks up to about 0.3mm are treated as hairline, and cracks wider than about 1mm should prompt investigation of the substrate and structure before any render repair begins.
Check window and door reveals, bellcast beads, and render-to-soffit junctions, these are where water most commonly gets behind the render. Missing or corroded movement beads, or render taken solid across movement joints, are common causes of cracking.
Causes of Render Failure
| Cause | Likely symptom | Typical location |
|---|---|---|
| Thermal movement (no movement joints) | Vertical or stepped cracks at 6–8m intervals | Large uninterrupted elevations |
| Sulphate attack (from brick) | Render pushed off, horizontal cracking | Near DPC level, under sills |
| Poor suction/key | Drummy render, wide areas of debonding | Whole elevations |
| Hard cement on soft brick (pre-1919 buildings) | Brick face spalling behind render | Victorian/Edwardian solid walls |
| Moisture ingress via failed details | Blown render, staining | Around windows, near ground level |
| Substrate movement (lintel failure, settlement) | Stepped diagonal cracks | Above openings |
Long runs of sand and cement render need movement joints, commonly at intervals of no more than about 6 metres on flat elevations, and at re-entrant corners. Their absence is one of the most common causes of cracking on post-war rendered houses.
Repair Approaches
Patch repair is viable where hollow areas are small, isolated, and surrounded by well-bonded render. Hack out the defective area to a clean edge (undercut the perimeter slightly so the patch keys in), brush out dust, dampen the substrate, apply bonding agent or slurry if needed, and build up the patch in the same render type and mix as the original. Feathered edges fail; patch edges must be hard, clean, and well-bonded. Colour match on sand and cement is difficult once the original has weathered; monocouche patches are nearly invisible when matched correctly.
Full hack-off and rerender becomes economical when drummy areas cover more than 30–40% of the elevation, when the substrate needs repair or tanking, or when a change of render type is warranted. On pre-1919 properties where hard cement render is causing brick spalling, a full hack-off followed by lime render is the correct conservation approach. The substrate should be allowed to dry before applying lime render; NHL renders should not be applied when frost is expected or in cold weather (suppliers commonly set a minimum of about 5°C), or in direct strong sunlight.
Tanking and damp treatment may be needed before rerenderig if the substrate is contaminated with hygroscopic salts (white crystalline deposits on the masonry face indicate this). Render applied over salt-contaminated masonry will blow again within a few years.
Costs in 2026
| Render type | Typical coat thickness | Lifespan | Cost per m² (patch repair) | Cost per m² (full rerender, installed) | Suitability |
|---|---|---|---|---|---|
| Sand and cement | About 20mm (2 coats) | 15–25 years | £35–65 | £40–90 | Post-1920 cavity walls |
| Natural hydraulic lime (NHL 3.5) | 20–30mm (3 coats) | 25–50+ years | £55–80 | £60–120 | Pre-1919 solid walls, listed buildings |
| Monocouche / through-colour | 15–20mm (1 coat) | 20–30 years | £50–80 | £60–120 | Modern cavity walls, large elevations |
| Silicone thin-coat (on EWI basecoat) | 1.5–3mm | 20–25 years | £45–70 | £70–150 | EWI retrofit, flexible bases |
Scaffold allowance for a typical three-bedroom semi-detached (front elevation only): £600–1,400. Full perimeter scaffold: £1,800–2,500. Scaffold is usually the biggest single cost variable on a render project and can dwarf the material and labour costs on a small patch job, combining render work with other external works (fascia, gutters, windows) makes practical and financial sense.
Planning and Building Regulations
Render repairs to a matching specification and colour are maintenance, and works that do not materially affect the external appearance of a building are not development, so they need no planning permission.6 On article 2(3) land, which includes conservation areas, permitted development does not cover cladding any part of a house with render, so rendering a previously unrendered wall in a conservation area needs planning permission.7 Painting the outside of a building, including repainting render in a new colour, is permitted development.8 A council can withdraw that right in a defined area with an article 4 direction.9 On a listed building, including a curtilage-listed one, works that would affect its character, such as removing historic render or changing its finish, need listed building consent.10 Always check with your local planning authority before changing the finish or colour of render in a conservation area or on a listed building.
Patch repairs do not reach the Building Regulations threshold, but renewing render over most of a wall does. Approved Document L treats rendering the external surface of a wall as renovating a thermal element.11 If more than 50% of a wall is renovated, the whole wall should be improved to at least 0.30 W/m²K where that is technically, functionally and economically feasible.11 For render removed from a wall, the area that counts is the whole elevation, so talk to Building Control before a full re-render.11
Factory-made render mortars are made to BS EN 998-1 (Specification for mortar for masonry, Part 1: Rendering and plastering mortar); the standard does not cover render mixed on site.12 For historic buildings, the Society for the Protection of Ancient Buildings (SPAB) and Historic England publish guidance on appropriate lime mortars that should be followed before specifying any repairs.2
A structural engineer’s opinion is advisable when cracks are wider than 1mm or are associated with other signs of movement such as sticking doors, sloping floors, or cracking to internal plasterwork.
The rules in this note are those that apply in England. Scotland, Wales and Northern Ireland have their own building standards and permitted development rights.
References (12)
Figures in this note were checked against the sources below on 30 September 2026. Superscript numbers in the text point to them. Every source the site cites, by topic.
- 1technicalvery strongMinistry of Housing, Communities and Local Government.RN-NPO8FJThe statutory figures behind a damp diagnosis, and the numbers to quote when a note explains why ground levels or a bridged damp proof course cause rising damp. Paragraph 5.2 requires that in an external wall the damp-proof course should be at least 150mm above the level of the adjoining ground (Diagram 8) unless part of the building protects the wall, and that in an external cavity wall the cavity should be taken down at least 225mm below the level of the lowest damp-proof course, or a damp-proof tray provided (Diagram 9a). For suspended timber ground floors it requires a ventilated air space of at least 75mm from the ground covering to the underside of any wall-plates and at least 150mm to the underside of the suspended timber floor or insulation, with ventilation openings on two opposing external walls of not less than 1,500mm2 per metre run of external wall or 500mm2 per square metre of floor area, whichever is greater; for suspended concrete floors the clear ventilated space is at least 150mm with the same opening sizes. Section 2.39 onwards covers radon, referring to BRE Report BR 211 for protective measures. The 2013 edition was published on 3 September 2013 with changes in effect from 1 October 2013.
- 2technicalgoodSociety for the Protection of Ancient Buildings (SPAB), guidance.RN-777J8GSPAB's technical advice on lime, the binder used for mortars, plasters, renders and washes in nearly all old British buildings before the mid-19th century. Explains the lime cycle: quicklime is produced by heating limestone in a kiln, slaked lime is made by combining it with water to give a putty stored in tubs, a bagged hydrate powder, or a dry-slaked mix where the reaction takes place in sand, and lime-based products then harden by absorbing carbon dioxide and reverting to calcium carbonate, a process called carbonation. Sets out the two types used in conservation work: non-hydraulic lime from relatively pure limestone, classified CL under European standards, which hardens only by carbonation and is described as 'fat' when purest and 'lean' when less pure; and natural hydraulic lime from limestone containing reactive silica and aluminium impurities, which sets harder because calcium silicates and aluminates form in the presence of water. Notes that lime lets structures breathe and move gently, that building with lime is slow and demands skill, and that Portland cement, gypsum plaster and plastic paints can seriously harm historic fabric.
- 3technicalfairEnergy Saving Trust, guidance.RN-54KWR6How to identify a cavity wall and what filling it costs. About 33% of all heat lost from an uninsulated home escapes through the walls. Houses built after the 1920s usually have cavity walls; pre 1920 houses are usually solid; houses from the 1990s onwards usually already have wall insulation. Identification: cavity walls show an even stretcher bond with all bricks laid lengthways, solid walls show an alternating pattern with header ends visible; a brick wall 260mm to 350mm thick is likely a cavity wall, narrower is likely solid, stone walls are solid up to about 500mm thick and earth walls run 300mm to over a metre. Typical installed cost around £2,200 in Great Britain and around £1,000 in Northern Ireland, with payback usually five years or less. Unsuitable where the wall is exposed to extreme weather or flooding, in poor condition, at risk of overheating, or where the cavity is narrower than 50mm. External repairs to brickwork, pointing, roofs, gutters and downpipes must be completed first or damp can be trapped. Underfloor grilles, airbricks, wall vents and trickle vents must not be blocked. Post installation damp is chased through the installer, then the Cavity Insulation Guarantee Agency guarantee or an independent insurance backed guarantee.
- 4technicalsupplier figureK Rend, guidance.RN-S63YXXMaker's product page for K Rend Silicone K1, a through-coloured one-coat render, giving a nominal 16–20mm thickness when applied direct to blockwork.
- 5technicalsupplier figureK Rend, guidance.RN-U2YS8EMaker's page for K Rend Silicone TC 15, a 1.5mm-grain thin-coat topcoat applied over a base coat and primer to the thickness of its largest grain.
- 6technicalvery strongThe National Archives (legislation.gov.uk), legislation.RN-M6VJS2Section 55(1) defines development as the carrying out of building, engineering, mining or other operations in, on, over or under land, or the making of any material change in the use of any buildings or other land. Section 55(2)(a) excludes works to a building which affect only the interior of the building or which do not materially affect the external appearance of the building, which is why internal renovation does not need planning permission.
- 7technicalvery strongThe National Archives (legislation.gov.uk), legislation.RN-Z0XQ8VParagraph A.1 sets the householder extension limits: buildings may not cover more than 50 per cent of the curtilage (A.1(b)); a single-storey rear extension may not extend more than 4 metres beyond the rear wall of a detached house or 3 metres for any other house, nor exceed 4 metres in height (A.1(f)), rising to 8 metres and 6 metres under the larger home extension route (A.1(g)); an extension of more than one storey may not extend more than 3 metres beyond the rear wall or be within 7 metres of the rear boundary (A.1(h)); eaves within 2 metres of a boundary may not exceed 3 metres (A.1(i)); a side extension may not exceed 4 metres in height, have more than one storey or be wider than half the width of the original house (A.1(j)). Paragraph A.2 removes cladding and side or multi-storey rear extensions on article 2(3) land such as conservation areas. A.3 requires materials of similar appearance and obscure-glazed, non-opening upper-floor side windows unless the opening part is more than 1.7 metres above the floor, and A.4 sets the neighbour consultation (prior approval) procedure with its 42-day determination period.
- 8technicalvery strongThe National Archives, guidance.RN-IYI8NOGPDO Part 2 Class C grants permitted development for painting the exterior of any building, except painting for advertisement, announcement or direction.
- 9technicalvery strongMinistry of Housing, Communities and Local Government (GOV.UK), guidance.RN-SM4299States that planning permission is only needed if the work is development within section 55 of the Town and Country Planning Act 1990, and that interior alterations and works that do not materially affect the external appearance of a building are not development (paragraph 001). Explains permitted development rights under the GPDO 2015 and their restriction on article 2(3) land such as conservation areas, National Parks, AONBs, the Broads and World Heritage Sites (paragraphs 016 to 017), prior approval including the neighbour consultation scheme for larger single-storey rear extensions (paragraphs 026 to 032), lawful development certificates (paragraph 024) and article 4 directions, which must be applied in a measured and targeted way to the smallest geographical area possible and can make an authority liable for compensation (paragraphs 036 to 043). Page last updated 26 July 2023.
- 10technicalvery strongThe National Archives (legislation.gov.uk), legislation.RN-XN22L9The provision that decides when listed building consent is actually needed, and the answer to the common overstatement that any alteration to a listed building requires consent. Section 7(1): 'no person shall execute or cause to be executed any works for the demolition of a listed building or for its alteration or extension in any manner which would affect its character as a building of special architectural or historic interest, unless the works are authorised under section 8.' The trigger is therefore effect on character as a building of special architectural or historic interest, not alteration as such, so work with no effect on that character falls outside the restriction. Section 7(2) makes subsection (1) subject to section 33(1) of the Planning Act 2008, which excludes the requirement for other consents where development consent is required. Authorisation itself comes from section 8.
- 11technicalvery strongMinistry of Housing, Communities and Local Government.RN-L0FCJXThe in-force U-value tables a DIY insulation or door note must quote, with the exact numbers. Table 4.2, limiting U-values for new fabric elements in existing dwellings, sets roof 0.15, wall 0.18, floor 0.18, swimming pool basin 0.25, window 1.4 or Window Energy Rating Band B minimum, rooflight 2.2, doors with more than 60 per cent of the internal face glazed 1.4 or Doorset Energy Rating Band C minimum, and other doors 1.4 or Doorset Energy Rating Band B minimum. Table 4.3, for existing elements, gives a roof threshold of 0.35 and an improved value of 0.16, which is the figure a loft insulation note needs: paragraph 4.12 says a retained element whose U-value is higher than the column (a) threshold, for example through a loft or garage conversion, should be upgraded to the column (b) value. Paragraph 4.13 allows a lesser upgrade only where the improved value is not technically or functionally feasible or would not achieve a simple payback of 15 years or less. Paragraph 4.8 requires a replacement element to be no worse than the one it replaces as well as meeting Table 4.2. Paragraph 4.10 gives the heritage exception: where character must be maintained, a centre pane U-value of no more than 1.2 or low-emissivity secondary glazing. Note 9 records that the timber window concession of 1.6 or Band C ended on 14 June 2023. The 2021 edition came into force on 15 June 2022; a 2026 edition exists at https://assets.publishing.service.gov.uk/media/69c122a6cfa346b9d4704a55/ADL1_2026.pdf.
- 12technicalstrongBSI, a standard.RN-NMRO24The product standard for bagged render and plaster, the one a monocouche, silicone or Tyrolean render should be declared to. Published 30 Nov 2016, Current, with Designated status for UKCA marking. Part 1 of the BS EN 998 series applies to factory made rendering and plastering mortars based on inorganic binders for external rendering and internal plastering on walls, ceilings, columns and partitions, and contains definitions, final performance requirements, the assessment and verification of constancy of performance regime and the marking requirements. The binder boundary is spelt out: a calcium sulphate binder may be used as an additional binder with air lime, and if air lime is the principal active binding component the mortar is covered here, but if calcium sulphate is the principal binder it falls under EN 13279 instead. Three exclusions matter on site: site-made rendering and plastering mortars are outside its scope and are covered by codes of application and national specifications; mortars with calcium sulphate as principal binder are excluded; and special fire-resistant and acoustic mortars, structural repair mortars, smoothing and trueing materials, paints, coatings, thin-layer organic renders and prefabricated units such as plasterboard are not dealt with.
-
Approved Document C, Site preparation and resistance to contaminants and moisture, 2004 edition incorporating 2010 and 2013 amendments, HM Government, accessed 30 September 2026. assets.publishing.service.gov.uk
-
Lime, Society for the Protection of Ancient Buildings, accessed 30 September 2026. spab.org.uk
-
Cavity wall insulation, Energy Saving Trust, accessed 30 September 2026. energysavingtrust.org.uk
-
Silicone K1, K Rend, accessed 30 September 2026. k-rend.co.uk
-
Silicone TC 15, K Rend, accessed 30 September 2026. k-rend.co.uk
-
Town and Country Planning Act 1990, section 55: Meaning of development, The National Archives, accessed 30 September 2026. legislation.gov.uk
-
The Town and Country Planning (General Permitted Development) (England) Order 2015, Schedule 2, Part 1, Class A, The National Archives, accessed 30 September 2026. legislation.gov.uk
-
The Town and Country Planning (General Permitted Development) (England) Order 2015, Schedule 2, Part 2, Class C, The National Archives, accessed 30 September 2026. legislation.gov.uk
-
When is permission required?, Ministry of Housing, Communities and Local Government, accessed 30 September 2026. gov.uk
-
Planning (Listed Buildings and Conservation Areas) Act 1990, section 7, The National Archives, accessed 30 September 2026. legislation.gov.uk
-
Approved Document L, Conservation of fuel and power, Volume 1: Dwellings, 2021 edition incorporating 2023 amendments, HM Government, accessed 29 September 2026. assets.publishing.service.gov.uk
-
BS EN 998-1:2016 Specification for mortar for masonry - Rendering and plastering mortar, British Standards Institution, accessed 30 September 2026. knowledge.bsigroup.com