Building a garden pond is one of the most rewarding weekend projects you can take on. A well-built pond attracts frogs, newts, dragonflies, and birds within the first season, and once established, requires surprisingly little effort to maintain. The job is mostly physical, digging, levelling, and lifting, rather than technical.
The information below covers a standard flexible-liner pond suitable for either wildlife or ornamental use. For a typical 3 m x 2 m pond, budget a weekend for construction and around £416–£881 in materials, or up to £1,081 with a pump and filter.
Planning: Size, Depth, and Location
Getting the planning right saves a great deal of effort later.
Size: Bigger is almost always better. Larger ponds are more stable, water temperature and chemistry fluctuate less, algae is easier to control, and the ecosystem is more resilient. The minimum practical size for a wildlife pond is around 1.5 m x 1.5 m. A 3 m x 2 m pond is a comfortable target for most gardens, and its 6 m² surface is well above the 3.5 m² the RHS suggests as a minimum for fish.1
Depth: A shallow pond overheats easily in summer and is more likely to freeze in winter, both of which can harm fish and other pond life. The RHS advises that every pond should be at least 38 cm deep.1 Aim for at least one area 60–90 cm deep. Include two shelf levels, one at 20 cm depth for marginal plants and one at 40 cm for deep-water marginals, giving your pond a naturalistic profile and maximum habitat variety.
Location:
- Choose a sunny or partly shaded spot with at least half the pond in full sun.1 Full shade suppresses aquatic plant growth.
- Avoid overhanging trees. Leaf fall in autumn loads the pond with nutrients and can cause serious water quality problems. Tree roots can also puncture liners over time.
- Keep clear of garden structures and boundary walls where ground movement could cause issues, and check for buried services before digging a large or deep pond.1
- For wildlife ponds, a gently sloping edge on at least one side allows hedgehogs, frogs, and other creatures to enter and exit safely.1
Materials
The table below shows materials and estimated costs for a 3 m x 2 m pond with a maximum depth of 80 cm, including shelf zones.
| Material | Quantity Needed | Unit Cost | Estimated Total |
|---|---|---|---|
| Butyl rubber liner (0.75 mm) | ~22–25 m² (see calculation) | £12–£17/m² | £264–£425 |
| Geotextile underlay | ~22–25 m² | £2.80–£3.50/m² | £62–£88 |
| Edging stone / sandstone slabs | 8–10 linear metres | £8–£25/m | £64–£250 |
| Sharp sand (for base levelling) | 2–3 bags | £4–£6/bag | £8–£18 |
| Submersible pump (ornamental) | 1 unit | £40–£120 | £40–£120 |
| Filter unit (ornamental) | 1 unit | £30–£80 | £30–£80 |
| Aquatic plants | 6–10 plants | £3–£10 each | £18–£100 |
| Total (wildlife pond) | - | - | £416–£881 |
| Total (ornamental with pump/filter) | - | - | £486–£1,081 |
As a check on the liner line, one specialist supplier lists 0.75 mm butyl from £11.85 per m².2 Another sells it at £17.42 per square metre.3 Pond fleece underlay costs £25.20 for a 3 m by 3 m sheet, about £2.80 per m².4 A thicker 5 m by 2 m underlay costs £34.99, or £3.50 per m².5
Liner size calculation: Use the formula: Length + (2 x maximum depth) + 0.6 m overlap (30 cm each side) = liner length. Width + (2 x maximum depth) + 0.6 m overlap = liner width. For a 3 m x 2 m pond at 80 cm deep: liner = (3 + 1.6 + 0.6) x (2 + 1.6 + 0.6) = 5.2 m x 4.2 m, about 22 m². Buy the next standard roll size up.
Butyl vs EPDM liner: Butyl rubber is the traditional choice: flexible and UV resistant. The RHS rates it more durable than PVC, with a lifespan of 25 to 50 years or more.1 EPDM (the same material used in flat roof membranes) is usually slightly cheaper and similarly durable; both are safe for fish and wildlife. PVC liner is cheaper again but less durable, so it is a poor choice for a permanent pond.
Step-by-Step Construction
1. Mark Out the Shape
Use a garden hose or rope to mark out the pond outline. An informal kidney or teardrop shape looks more natural than a rectangle and is no harder to build. Once happy with the shape, mark around it with sand or spray paint.
2. Excavate the Pond
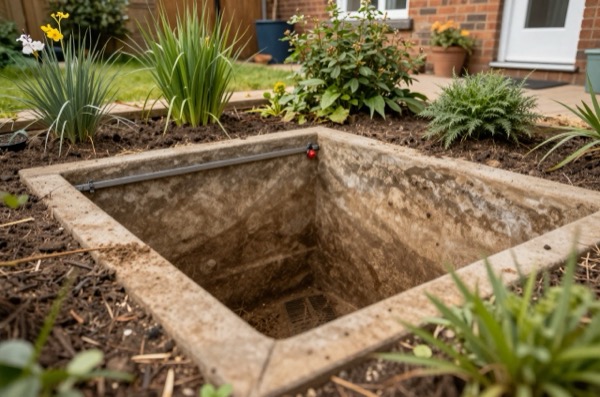
Strip the turf inside the marked area and set it aside. Dig down to the first shelf level at 20 cm, then mark the inner zone and dig to the second shelf at 40 cm, then finally excavate the deepest central section to 60–90 cm. Keep the spoil, it is excellent for building up raised beds.
Check that the edges are level using a spirit level on a long straight board across the pond opening. An unlevel pond looks odd when filled, with one side of the liner showing and the other submerged.
Tamp the base and shelves firm and remove any sharp stones, roots, or flints that could puncture the liner over time.
3. Lay the Underlay
Spread geotextile underlay over the entire excavated area, pushing it into the shelves and corners. This acts as a cushion and protects the liner from below. Old carpet or thick sand (5 cm deep) can substitute in a pinch, but purpose-made underlay is worth the modest extra cost.
4. Lay the Liner
With a helper, drape the liner over the pond and gently push it into the contours. Do not pull it tight, allow plenty of folds and pleats at the corners. Weight the edges temporarily with a few stones and begin filling with water from a hose. The weight of the water will mould the liner to the shape of the pond as it fills. Adjust pleats neatly as the water level rises.
Leave about 30 cm of liner draped over the edges all the way around. Do not trim it until the pond is fully filled.
5. Edge and Finish
Once the pond is full, fold the excess liner back flat on the ground and trim it to leave roughly 15–30 cm beyond the edge of the pond. Lay edging stones directly onto the folded liner, overhanging the water by 3–5 cm. This hides the liner and provides a firm, stable edge. For a wildlife pond, leave at least one area without stone edging and slope the liner and soil gently into the water.
Backfill around any gaps in the stone edging with soil to lock the stones in place.
6. Install Pump and Filter (Ornamental Ponds)
For an ornamental pond with fish, position the submersible pump on the base of the deepest zone and run the cable out over the edge (concealed under edging stone) to a weatherproof outdoor socket. Any new outdoor socket or cable run for the pump should be installed by a qualified electrician.1 Connect the pump to an external filter unit, positioned just out of sight near the pond edge, following the manufacturer’s instructions. A separate UV clarifier fitted inline will significantly reduce green water problems.
Wildlife ponds do not need pumps, they are designed to be self-sustaining ecosystems.
7. Plant Up
If you filled from the tap, let the water stand for a few days, or treat it with a pond dechlorinator, before introducing fish. Where you can, fill and top up with rainwater from a butt instead, because mains water contains nutrients that encourage algae.1 Plant marginals in aquatic baskets filled with loam-based compost, topped with gravel to prevent compost washing out. Place baskets on the appropriate shelf depth for each species.
Good starter plants for a UK wildlife pond include:
- Marsh marigold (Caltha palustris), shelf at 0–10 cm
- Water forget-me-not (Myosotis scorpioides), shelf at 0–20 cm
- Hornwort (Ceratophyllum demersum), submerged oxygenator, no basket needed
- Miniature water lily (Nymphaea compact variety), basket at 30–50 cm depth
Planning Permission and Legal Considerations
Most domestic garden ponds in England do not require planning permission under permitted development rights. A pond counts as a pool incidental to the enjoyment of the house under Class E of the General Permitted Development Order, so no application is usually needed.6 Class E does not apply within the curtilage of a listed building, and the pond must not sit forward of the front wall of the original house.6
However, if your pond will connect to a stream, ditch, or other watercourse, even temporarily, check before you dig. Work on or near a main river needs an environmental permit from the Environment Agency under the Environmental Permitting (England and Wales) Regulations 2016.7 For any other watercourse, the body to ask is your lead local flood authority (the county or unitary council) or the internal drainage board.8 If you plan to fill or top up the pond from a stream, river or borehole, you are likely to need an abstraction licence from the Environment Agency once you take more than 20 cubic metres (20,000 litres) a day.9 Properties in conservation areas, Article 4 Direction areas, or within the curtilage of a listed building may face additional restrictions. Always check with your local planning authority before starting work if any of these conditions might apply.
First Season Expectations
New ponds almost always turn green within the first few weeks as algae colonises the nutrient-rich water before beneficial bacteria and aquatic plants establish. This is completely normal and usually clears within a few weeks as the ecosystem finds its balance. Resist the temptation to change large volumes of water or add chemical treatments during this period, patience is the best strategy.
By the end of the first summer, a well-planted wildlife pond will typically have been discovered by frogs and water boatmen without any deliberate introduction. A functioning mini-ecosystem takes roughly one full growing season to establish.
References (9)
Figures in this note were checked against the sources below on 30 September 2026. Superscript numbers in the text point to them. Every source the site cites, by topic.
- 1technicalfairRoyal Horticultural Society, guidance.RN-7CJAW0RHS advice on siting and building a new pond; it gives the minimum surface area for keeping fish.
- 2costsupplier figurePond Liners Online.RN-604TZ3A price, true at 2026-09. A specialist pond supplier's product page for 0.75 mm butyl liner priced per square metre; it backs the low end of the butyl liner unit price.
- 3costsupplier figureSelective Koi Sales.RN-B46CU2A price, true at 2026-09. A pond retailer's product page selling 0.75 mm butyl liner by the square metre, taxes included; it backs the high end of the butyl liner unit price.
- 4costsupplier figurePondkeeper.RN-GVAO96A price, true at 2026-09. A pond supplier's product page for a 3 x 3 m fleece underlay at £25.20; it backs the low end of the underlay unit price.
- 5costsupplier figureAll Pond Solutions.RN-UQ9R8ZA price, true at 2026-09. A pond supplier's product page for a 5 x 2 m thick underlay at £34.99; it backs the high end of the underlay unit price.
- 6technicalvery strongThe National Archives (legislation.gov.uk), legislation.RN-J6L7TIThe primary legal text for garden rooms, sheds, summerhouses, pergolas, greenhouses and outdoor pools. Class E permits any building or enclosure, swimming or other pool within the curtilage required for a purpose incidental to the enjoyment of the dwellinghouse, plus a domestic heating oil container. Limitations: E.1(b) buildings, enclosures and containers other than the original dwellinghouse must not cover more than 50% of the curtilage; E.1(c) nothing forward of a wall forming the principal elevation of the original dwellinghouse; E.1(d) single storey only; E.1(e) maximum height 4 metres with a dual-pitched roof, 2.5 metres if any part is within 2 metres of a curtilage boundary, otherwise 3 metres; E.1(f) eaves no higher than 2.5 metres; E.1(g) not within the curtilage of a listed building; E.1(h) no verandah, balcony or raised platform; E.1(j) oil containers capped at 3,500 litres. E.4 defines incidental use as including keeping poultry, bees, pet animals, birds or other livestock for domestic needs or personal enjoyment, which is why a garden room used as a separate dwelling falls outside Class E.
- 7technicalvery strongEnvironment Agency, a government page.RN-3M56ABThe permit regime that catches garden and landscaping work close to water, last updated 11 March 2025. A flood risk activity permit is needed for work on or near a main river, on or near a flood defence structure, or in a flood plain or near sea defences. The buffer distances are the operative figures: within 8 metres of the bank of an ordinary main river, 16 metres of the bank of a tidal main river, 16 metres of a sea defence structure, and 8 metres of a flood defence structure, or 16 metres where that defence is tidal. Some low-risk activities can instead be registered as exempt: registration is free but must be completed before work starts. Doing the work without a permit or registered exemption is an offence. The Environment Agency aims to determine a standard application in about 2 months, or around 4 months where several activities are combined. Fees are set out in the separate environmental permits charging guidance. Note this sits alongside, not instead of, ordinary watercourse consent from the lead local flood authority for smaller ditches and streams.
- 8technicalvery strongEnvironment Agency, guidance.RN-YEX4Y9Environment Agency guidance for watercourse owners; it names the lead local flood authority or internal drainage board as the authority for non-main rivers.
- 9technicalvery strongEnvironment Agency, guidance.RN-D783N2Environment Agency guidance on water abstraction licensing; it sets the 20 cubic metres a day threshold.
-
How to Make a New Pond, Royal Horticultural Society, accessed 30 September 2026. rhs.org.uk
-
Butyl 0.75mm Rubber Pond Liner, Pond Liners Online, accessed 30 September 2026. Priced at 2026-09 and left there. pondlinersonline.co.uk
-
Butyl Pond Liner 0.75mm (per square meter), Selective Koi Sales, accessed 30 September 2026. Priced at 2026-09 and left there. selectivekoisales.co.uk
-
Fleece 3m x 3m Underlay, Pondkeeper, accessed 30 September 2026. Priced at 2026-09 and left there. pondkeeper.co.uk
-
High Quality Thick Pond Underlay 5 x 2m, All Pond Solutions, accessed 30 September 2026. Priced at 2026-09 and left there. allpondsolutions.co.uk
-
The Town and Country Planning (General Permitted Development) (England) Order 2015, Schedule 2, Part 1, Class E, The National Archives, accessed 30 September 2026. legislation.gov.uk
-
Flood risk activities: environmental permits, Environment Agency, accessed 30 September 2026. gov.uk
-
Owning a watercourse, Environment Agency, accessed 30 September 2026. gov.uk
-
Check if you need a licence to abstract water, Environment Agency, accessed 30 September 2026. gov.uk