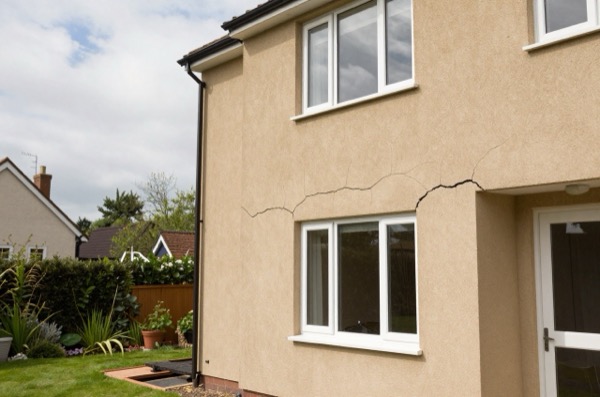
Cracked and blown plaster is one of the most common problems in UK homes, particularly in Victorian and Edwardian properties where the original lime plaster has been patched over the decades with incompatible gypsum-based products. Understanding the difference between a cosmetic crack and genuinely failed plaster, and choosing the right repair, saves money and prevents the problem from recurring within months.
Diagnosing the Problem: Cracks vs Blown Plaster
Blown plaster has detached from the substrate behind it, the bond between the plaster and the masonry (or lath) has failed. It sounds hollow when tapped with a knuckle and may flex or move slightly under pressure. In extreme cases it bulges visibly or falls away in sheets.
Cracked plaster is still bonded, the surface has fractured but remains attached. Cracks range from hairline fractures to cracks several millimetres wide. On BRE’s widely used damage scale, cracks up to about 5 mm wide count as aesthetic damage that needs only redecoration; wider cracks start to affect weather-tightness and the operation of doors and windows, and the widest raise questions of stability.1
The diagnostic process:
- Tap the wall systematically across the affected area. A dull, hollow sound indicates a void behind, the plaster is blown. A solid sound means the bond is intact.
- Check the crack width. A fingernail catches in any crack wider than about 0.5 mm. Cracks wider than about 5 mm, or any crack that keeps widening, warrant investigation of the cause before repair.
- Check for pattern. Stepped cracks following mortar joints suggest differential settlement or thermal movement. Diagonal cracks from window/door corners often indicate lintel movement. Horizontal cracks near the top of walls in a terraced house can indicate lateral thrust from roof spread.
Causes of Blown and Cracked Plaster
| Cause | Typical pattern | Action before repair |
|---|---|---|
| Age / general bond failure | Widespread hollow areas, older properties | None, simply re-plaster |
| Damp penetration | Staining, soft or powdery plaster | Fix the source of damp first |
| Incompatible repairs (hard gypsum over lime) | Cracks at patch edges | Remove incompatible material |
| Thermal movement | Fine cracks around window frames | Flexible filler, not hard plaster |
| Structural movement (active) | Wide / progressive cracks | Structural engineer assessment first |
| Impact damage | Localised hollow section | Patch repair |
| Frost damage (external walls) | Delaminating layers, especially solid walls | Investigate insulation / damp |
Never repair over damp plaster. If the plaster smells musty, shows tide-marks or gives a high moisture-meter reading, deal with the cause of the damp before any plastering work.2 Moisture meters give only a rough guide on plaster, so treat a high reading as a prompt to investigate rather than proof of damp.
Repair Options
Hairline Cracks (Under 0.5 mm)
Fill with a flexible decorator’s filler (Polyfilla Fine Surface or similar), sand when dry, and paint. These cracks often reappear seasonally with thermal movement. Where a crack keeps reopening, bridge it with fine joint tape (paper or fibreglass mesh tape embedded in filler).2
Materials cost: £3–£8 for filler and tape.
Wider Cracks (0.5–5 mm)
- Rake out the crack with a screwdriver or crack tool to create a V-profile and remove any loose material.
- Dampen the crack with clean water.
- Fill with a hard setting filler (Thistle Multi-Finish thinned to a thick paste, or a proprietary patching plaster such as EasiFill 60).
- Allow to shrink and dry, then apply a second coat.
- Sand flush, apply fine filler if needed, and redecorate.
Materials cost: £5–£15.
Blown Plaster (Small Areas, Under 0.5 m²)
Small blown areas can sometimes be re-attached rather than removed: conservators inject grout (a liquid mortar) through small drilled holes, or pin the plaster back with stainless steel screws and washers.2 This is particularly appropriate in listed buildings or rooms with ornate plasterwork where hacking off and re-plastering would destroy irreplaceable historic fabric.
More commonly, small blown areas in non-historic properties are hacked off and re-plastered:
- Cut around the blown area with a bolster chisel, extend the cut to sound plaster.
- Hack off the blown section back to the masonry or lath.
- Prime the background with the bonding primer recommended by the plaster manufacturer.
- Apply an undercoat plaster suited to the background (a bonding coat on low-suction surfaces, a browning or hardwall-type undercoat on ordinary brick or block) and allow to firm up.
- Skim with 2 mm Thistle Multi-Finish and feather into the surrounding surface.
Materials cost (per m²): £8–£18.
Large Areas of Blown Plaster (Over 1 m²)
At this scale, professional plastering becomes more cost-effective than DIY repairs, and the result will be significantly better.
| Scope | Typical plasterer cost (2026) |
|---|---|
| Single wall patch (0.5–2 m²) | £150–£350 |
| Full room re-plaster (25–40 m²) | £800–£1,800 |
| Re-plaster with hacking off and prep | £1,200–£2,500 |
| Per m² (day rate basis) | £25–£50/m² |
Day rates for plasterers in 2026 run £180–£280 per day outside London, and £250–£350 per day in London. A two-coat re-plaster of an average-sized bedroom (backing coat plus finish skim) usually takes a skilled plasterer more than one day, because the backing coat has to firm up before the skim goes on.3
Lime vs Gypsum Plaster: An Important Decision
In most pre-1920 properties the original plaster is lime-based, since gypsum-based substitutes only became widespread in the 20th century.2 Lime plaster is breathable, it allows moisture to migrate in and out of the wall mass, preventing damp build-up. Modern bagged gypsum plaster is harder and more brittle than lime and cannot flex with an old wall, so a gypsum patch in a lime wall is a common cause of recurring cracks at the patch edges.4
If you are patching a significant area in a pre-1920 property, consider a lime plaster to match the original, or ask a plasterer experienced in traditional lime work. For a straightforward modern property, gypsum is the correct choice.
When to Re-Plaster Instead of Patching
Patching is appropriate when:
- As a rough guide, less than about a quarter of the room’s plaster area is blown.
- The surrounding plaster is sound and well-bonded.
- The property is post-1960 and gypsum throughout.
Re-plastering is the better option when:
- More than a quarter of the wall area is blown.
- There are multiple generations of incompatible patches.
- You are about to redecorate and want a flat, uniform surface.
- Damp has caused widespread plaster failure across a wall.
A new plaster skim coat (on existing sound browning coat) costs less than full re-plastering and is often the right compromise, the plasterer removes loose areas, patches, re-skims the whole wall, and you get an even, flat surface that takes paint perfectly.
References (4)
Figures in this note were checked against the sources below on 30 September 2026. Superscript numbers in the text point to them. Every source the site cites, by topic.
- 1technicalstrongBRE Group, guidance.RN-9DKPYOBRE's guidance on its crack damage categories. It treats cracks up to 5 mm as aesthetic, categories 3 and 4 as serviceability and category 5 as stability issues.
- 2technicalfairThe Society for the Protection of Ancient Buildings, guidance.RN-30HGMTSPAB technical advice on repairing old plasterwork. It says the cause of any defect, including damp, must be dealt with before the plaster is repaired.
- 3costvery strongOffice for National Statistics.RN-MMT1DOA price, true at 2025-03. The ASHE Table 14 dataset gives annual estimates of paid hours worked and earnings for UK employees by sex and by full-time or part-time status, broken down to four-digit Standard Occupational Classification, which is the level that isolates individual construction trades such as bricklayers, carpenters, plasterers and electricians. Released 23 October 2025 as the 2025 provisional edition (zip, about 10.7 MB), with revised and provisional editions back to 2017. A correction dated 19 December 2025 suppressed annual pay estimates for SOC 3312 police officers in some areas; construction occupations are unaffected.
- 4technicalsupplier figureThe Building Conservation Directory, guidance.RN-KN21V6A conservation-practice article on gypsum plaster in old buildings. It explains that modern bagged gypsum plasters are too hard and brittle to move with an old building.
-
Assessing cracks in houses, BRE Group, accessed 30 September 2026. bre.co.uk
-
Lime or clay plaster, The Society for the Protection of Ancient Buildings, accessed 30 September 2026. spab.org.uk
-
Annual Survey of Hours and Earnings 2025, Table 14.6a, SOC 5321, Office for National Statistics, accessed 30 September 2026. Priced at 2025-03, so no calibration is needed. ons.gov.uk
-
The Use of Gypsum Plaster, The Building Conservation Directory, accessed 30 September 2026. buildingconservation.com